Thursday, October 31, 2013

A Hanukkah Pin For Cross Stitchers

The past two weeks have been a wild ride for me. After dealing with a relative's health issues and my own bad cold, I really appreciate having a couple of backup projects to share. Both projects are Hanakkah themed and were created last year before I started this blog. I'll share one of them with this post and the other at another time.

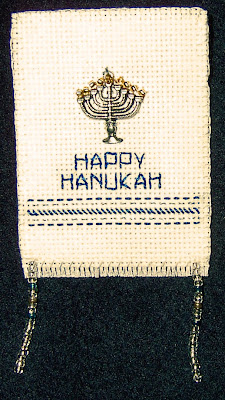
I enjoy designing various pins and when my daughter purchased a Menorah charm for me at a going-out-of-business beading store, it was the perfect embellishment to use on a pin.
This measured just under 1 square inch.
To make this pin I used a 2 inch by 3 inch piece of 18 count cross stitch fabric for a base. I stitched a very simple pattern on it to simulate a tallit and straight stitches for the wording. Blue cross thread and silver metallic thread was used.  The Menorah was attached with stitching and gold beads were stitched on to simulate candle flames. Then felt was glued on the back and the edges were finished with blanket stitch. The bottom was fringed and strands of beads were added at the bottom corners. Lastly a pin was sewn onto the back.
After I finished I realized that maybe Hanukah wasn't spelled right. What to do? I looked it up on the internet and found at least 16 or more different ways to spell it and this was included. Whew! I had visions of having to take it apart and redo it. I was glad not to have to.

Hopefully life will settle down to a roar very soon. I want to do much on this blog to make it more interesting to my viewers. Maybe more instructions, links and ideas to run with.

Hugs! Roxanne

Thursday, October 24, 2013

A Little Dove Told Me

The idea I'm sharing can be modified in so many ways. My project today is a decorative pillow to be hung on the back of your dining chair. This could be adapted to any of the Feast Days or just to add some pizzaz to your dining spot. The sky is the limit.

Decide on a theme for your project. I chose favorites of mine...doves and the Tetragrammaton. I chose to make a little pillow about 4 by 9 inches as a base but they can be made any size you desire. I made sure that I sewed ribbons to be used for tying the pillow to the chair into the seam as I was making it. Give yourself plenty of ribbon length. You can always trim it if you've added too much.

After making my pillow I cut dove shapes from felt (two each facing different directions) and sewed the layers together with a simple running stitch. A piece of gold felt was cut out and a smaller piece of white felt was glued on it. Then I carefully cut out the letters of the Tetragrammaton and glued those on. I proceeded to glue each assembled dove and center block onto my pillow. I little piece of ribbon was glued from each dove to the corner of the center block. Lastly I ran glitter glue around the frame of the letter block and a dab of glitter glue for the doves' eyes.


Friday, October 18, 2013

Pendants 3

This is the first time I have attempted making jewelry using Sculpey. Those who read this blog probably already know Sculpey is a crafting clay that you form and then bake to make your project permanent. I found it very easy to work. I basically broke off a piece of the clay and used a round plastic rod to roll it to the thickness I wanted much like making pie crust. I followed this by folding over the top edge of the clay to form a channel to pass a cord through. Then I broke off another piece and rolled it into very thin ropes. I used those ropes to form my design on the flattened piece of clay. I made three of these to be used as pendants. Then into the oven they went. Lastly I painted my pendants with a variety of acrylic paints and threaded each with a cord for wearing.

Please forgive me but I was so intent on making my project I forgot to take pictures of the process. And so, I only have pictures of the finished projects to show you.
I found that metallic and iridescent paints looked the best for this project.
 The following two pictures are of the same pendant. However I added a little rhinestone to the bottom of my motif shown in the last picture.


I could definitely use more practice at forming my designs but I thoroughly enjoyed making these regardless.

Thursday, October 10, 2013

A Mezuzah For Indoors


Deuteronomy 6:4 Hear, O Israel: The LORD our God is one LORD:

Deuteronomy 6:5 And you shall love the LORD your God with all your heart, and with all your soul, and with all your might.

Deuteronomy 6:6 And these words, which I command you this day, shall be in your heart:

Deuteronomy 6:7 And you shall teach them diligently to your children, and shall talk of them when you sit in your house, and when you walk by the way, and when you lie down, and when you rise up.

Deuteronomy 6:8 And you shall bind them for a sign on your hand, and they shall be as frontlets between your eyes.

Deuteronomy 6:9 And you shall write them on the posts of your house, and on your gates.

With these words from the Torah in mind I designed a mezuzah to be placed inside our home next to our bedroom door.

First a size was selected and a pattern made accordingly. The shape of the mezuzah was cut out and adhered to the cream colored inner border with a heat bonding material. Then it was decorated with metallic craft paint and glitter glue. That in turn was sewn onto the first layer of the blue background.  A slit was made in the second layer of the background for a place to insert The Shema. I made the three little tabs at the bottom each with two layers of felt and did a blanket stitch around the edges and placed them between the two background layers. The two background layers were then joined with a blanket stitch edging. Finishing touches were adding the beads at the bottom of the tabs and sewing a ring on the back to hang it by.

Thursday, October 3, 2013

The Tree Of Life

Gen 2:9 And out of the ground made the LORD God to grow every tree that is pleasant to the sight, and good for food; the tree of life also in the middle of the garden, and the tree of knowledge of good and evil.

In deciding what project to prepare for this weeks blog entry I chose a symbol from last week's Torah portion...the Tree of Life. Trees in general are one of my favorite subject matter when it comes to my crafting and art work. This week I opted for another mug rug, also one of my favorite things to make.
For the tree I chose a commercial stencil from my stash. Various acrylic paints were used and applied to a piece of linen fabric. I chose a fancy piece of cotton fabric framed in a glitzy border fabric. This was layered with heat reflecting batting and backed and framed with plain red cotton. Another mug rug finished!
Partake of the Tree of Life and be blessed!