
Tuesday, April 30, 2013
Finally It's Finished As Promised
Has the suspense been eating at you? As promised I'm posting my lastest creation today. It was somewhat of a hassle as I was designing it as I went. All done in counted cross stitch, I spent two days on one aspect of it and decided it wasn't quite right for this project. Then I ripped out what I didn't like and started over. Now it's done. Each letter is outlined in gold cord as is the border around each block. I shot a picture of this before I framed it so the glare of the camera flash wouldn't spotlight on the glass. Drum roll please!
 Here we go with Hebrew again. This time it's the Tetragrammaton...the name of our great King Yahweh. http://www.eliyah.com/tetragrm.html
Thursday, April 25, 2013
Another Delay
I know that I promised another project to share but time constraint haven't allowed me to finish. Between household duties and outside cleanup (yes, Spring has finally arrived!) time seems to be shrinking between postings. We're having company join us for Shabbat this week and the house is still in need of some cleanup. I may not have the next project finished but it's on it's way. I definitely will have it ready to post on my usual Tuesday next but I'm sharing a peek at the current project for you. Can you guess what it might be? Drum roll please.
 An just to further wet your whistle here is a song that a friend sent me a link to. This is also a clue to my unfinished project. I'm sorry but blogger won't cooperate tonight so I'm just posting the link to the YouTube video. The title of this song is 'The Name Of God Is The Sound Of Our Breathing' sung by Jason Gray. Enjoy!
http://youtu.be/1wIQDojp-MI

http://youtu.be/1wIQDojp-MI
Tuesday, April 23, 2013
A Substitution
After my last post about a project which I considered a flop, I've been working on a much better project. But alas, I realized I couldn't complete it in time for today's post so I worked up a substitute. I enjoy displaying little pillows of all kinds in our home. Sometimes they are displayed on shelves and sometimes in baskets.
If you've been reading my past posts you'll notice that I include words in many of my projects. By including words in Hebrew it helps me remember how to spell them in Yahweh's language. The following counted cross stitch is my own design. Yes, I know the challah loaf doesn't look quite right so bear with me. It's the artist's interpretation that counts.
Deu 5:12 Keep the sabbath day to sanctify it, as the LORD your God has commanded you.
If you've been reading my past posts you'll notice that I include words in many of my projects. By including words in Hebrew it helps me remember how to spell them in Yahweh's language. The following counted cross stitch is my own design. Yes, I know the challah loaf doesn't look quite right so bear with me. It's the artist's interpretation that counts.
 |
| Glass beads were added to represent candle flames. |
Deu 5:12 Keep the sabbath day to sanctify it, as the LORD your God has commanded you.
Friday, April 19, 2013
Update
If you viewed my post from yesterday you saw that I was not exactly thrilled with the outcome of my project. Last night I went back to try and achieve a better example than the first one. I changed it somewhat by cutting out the main word and backing it with another color. Then I used a slightly larger frame. See if you like the results. Please excuse the slight reflection in the glass.
 Compare it with the old. I don't think there is a comparison. I vote for the updated version.


Thursday, April 18, 2013
A Little Kitsch For The Kitchen
Sometimes our best efforts leave us wanting. Although I'm definitely not thrilled about the outcome of my latest project I'll share it anyways. I wanted to give readers a simple project anyone could do. I decided to replace a small picture in my kitchen with something more in line with with this blog. So the primitive cross stitch doll picture came off the wall and the work began. After my second try I came up with this (minus the frame):
 The pattern was designed and transferred to a textured paper. I proceeded to go over the pattern with colored markers. It's a little plain so upon decorating a frame from 'ye ole frame stash', the project was placed in the frame. Upon hanging it in my kitchen, the whole project drooped to the right. You see, this frame was a combination stand up/wall hung frame and the stand part was so heavy it dragged the frame down on one side.
 As you can see, it is not hanging on the wall. And, although I am not happy with the look of it at all, I'm sharing it to let readers know not all of our endeavors are successful but we can glean a lesson from them if we look hard enough. And I admit I'm going back to the drawing board and I will work at this project until I am satisfied that it is something worth hanging on the wall. Stay tuned!


Tuesday, April 16, 2013
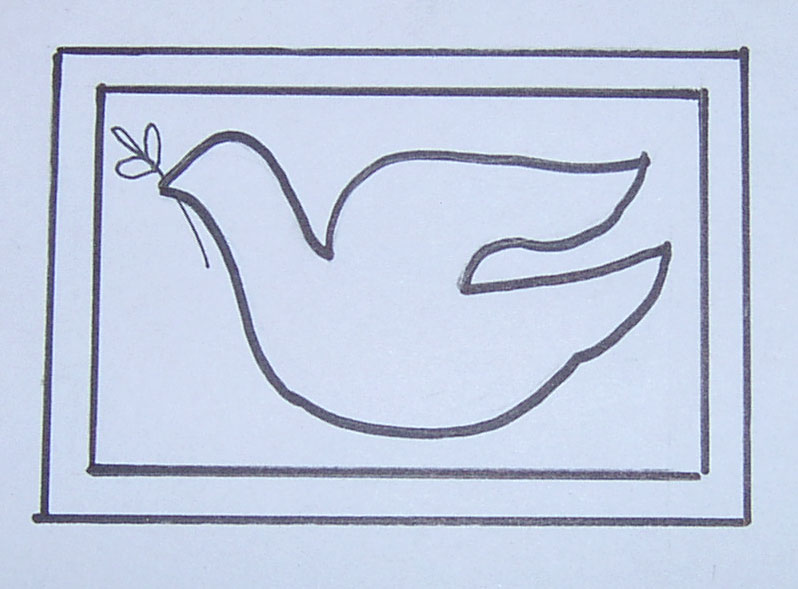
Dove Themed Kitchen Magnets
My project for today is a set of refrigerator magnets. These can either be sewn on the machine or glued together for the sewing challenged.

Gen 8:11 And the dove came in to him in the evening; and, see, in her mouth was an olive leaf plucked off: so Noah knew that the waters were abated from off the earth.
These were made of felt. The outside measurements are 3 3/4 inches by 2 5/8 inches. The inner panel (red) is 3 1/2 inches x 2 1/8 inches. First I layered the red and gold together and sewed a straight stitch around the red edges. Then I layered that to another piece of felt cut to the same size as the outside measurements and again sewed a straight stitch around the edges. I proceeded to add the doves and again sewed them on with a running stitch by hand. Small beads were added for eyes and the olive twig consisted of a piece of heavy thread and cut out felt leaves. Once it was all assembled I cut a piece of sheet magnet a bit smaller than the outside measurements for each magnet and glued it to the backs.
This is the pattern I drew up. You are welcome to copy it. Enjoy!


Psa 122:6 Pray for the peace of Jerusalem: they shall prosper that love you.

Gen 8:11 And the dove came in to him in the evening; and, see, in her mouth was an olive leaf plucked off: so Noah knew that the waters were abated from off the earth.
These were made of felt. The outside measurements are 3 3/4 inches by 2 5/8 inches. The inner panel (red) is 3 1/2 inches x 2 1/8 inches. First I layered the red and gold together and sewed a straight stitch around the red edges. Then I layered that to another piece of felt cut to the same size as the outside measurements and again sewed a straight stitch around the edges. I proceeded to add the doves and again sewed them on with a running stitch by hand. Small beads were added for eyes and the olive twig consisted of a piece of heavy thread and cut out felt leaves. Once it was all assembled I cut a piece of sheet magnet a bit smaller than the outside measurements for each magnet and glued it to the backs.
 | |


Psa 122:6 Pray for the peace of Jerusalem: they shall prosper that love you.
Thursday, April 11, 2013
A Jar Candle 'Snuggy'
Do you have a scented candle housed in a jar? The scent can be very nice if it's a higher quality but all of them have labels that can be rather ugly. And they never go with your decor. I've seen covers for these candles in craft magazines and decided to share my version with you.
I measured the circumference of my jar along with the height that I desired for my jar candle 'snuggy'. I added a 1/4 inch seam allowance to the height measure the top and bottom and extra to the circumference for a healthy overlap for the closing. I cut the fabric I wanted to cover the jar with to the those measurements. A backing was cut, placed face to face with the chosen fabric, then sewn together like a pillow with an opening left to turn it right side out positioning button loops made of trim at the back edge. After turning the piece right side out I then top stitched around the edges of the rectangle. I added a menorah previously stenciled to a different square of fabric on the front and gold trim around the edges. It was finished off with two buttons for closure. I'm sorry I couldn't get a closeup of the stenciled design which, by the way, came from http://www.craftcuts.com/menorah-stencil.html After stenciling the menorah I added some glitter paint to the candle flames.


For the sewing challenged this could be made by using a heat activated webbing to attach everything together. That is except for the buttons. LOL And you could also use velcro closures instead of buttons. Or you could make the whole thing from felt. I would advise, however, that you remove the snuggy from the jar when having the candle lit. Better safe than sorry.
Tuesday, April 9, 2013
Reflections
While working on my latest offering I was pondering on how my tastes had changed. When we moved to our present home five years ago I was heavily into the primitive style of crafts and decorating. Not that anything is wrong with that but, since being in this walk, I have found that my preferences have changed from what they had once been. And except for some touches of prim in my kitchen I never really got started decorating our new home in primitive style. I couldn't understand why I was going in a different direction. I think I may now have an answer to my query.
When the northern tribes of Israel fell into idolatry, Yahweh exiled them into the nations where they were assimilated. Their identity waslost hidden from future generations until these (the last) days. They forgot who they were and who they belonged to. They became like the commoners. They ate, dressed and acted like the common people. They surrounded themselves with the common. But the scales are falling off of the eyes of many of the decendents of that generation driven into the nations and they are waking up to their true heritage. I count myself among them.
And so, 'primitive' or 'common' is no longer a large part of my mindset. I now understand that I am no longer a commoner. I have a place Yahweh's Kingdom family. This change in style can be described in a number of words: courtly, cultivated, dignified, exquisite, genteel, graceful, luxurious, majestic, ornate, stately, refined, rich, sumptuous and so on. I tend to like rich brocades and paisleys in my creations along with gold and/or silver trimmings. Please don't think I'm trying to be snobbish or uppity here, just trying to explain why my work is changing. However, I am primarily a quilter although I dabble in many other creative endeavors. So I will still quilt and keep on decorating my kitchen in a farm-like motif.
Now for today's project. I have a narrow (under 6 inches wide) section of wall that needed to be filled. I'm delighted to share this wall hanging with you.

The base was constructed by adhering a piece of stiff interfacing (a item I've had knocking around my stash for untold years) to the back of paisley fabric with heat activated bonding tape. Interfacing that is heat activated on one side will also work. Then I sewed a backing material face to face with the paisley like you would a pillow and left the top opened. After turning it right side out I stitched the top closed.

Proceeding to the fabric that the letters would be adhered to I decided on the size, cut out top and back, sewed them face to face and turned them right side out. I sewed the edges of these 'tabs' closed after turning them under but I believe that was a mistake. On making these again I would just trim the tops with pinking sheers and top stitch closed because they will not show when the hanging is completed anyways.Then I added narrow gold trim around the tabs.

NOW THIS IS VERY IMPORTANT: Next I drew the letters to be used on paper, turned the paper on the backside and traced the letters with a heavy black marker. I traced the BACKWARDS letters on the paper side of Heat and Bond. Then I cut out the letters with a safety margin around them and adhered the heat and bond letters to the BACK OF MY FABRIC. Next the letters were cut out, the paper backing of the heat and bond was removed and the letters were adhered to the front of the tabs.

Next I positioned and sewed on the M of 'Shalom', then the nest letter O. Then after measuring the spacing between those two letters, I spaced the remaining letters appropriately. this gives kind of a three dimensional effect.

A crystal bead was sewed to the point of each tab. Lastly two rings were added to the top of the backing to hang my creation by.
An added note: For you non-sewers - each piece could be simply bonded together using a heat and bond type product. The hanging could be either made of fabric or felt. A blanket stitch could be used as edging, glitter paint could emphasize the letters, etc. Use your imagination and have fun with this. If you have questions leave a comment and I'll respond either by email or in the comment section.
When the northern tribes of Israel fell into idolatry, Yahweh exiled them into the nations where they were assimilated. Their identity was
And so, 'primitive' or 'common' is no longer a large part of my mindset. I now understand that I am no longer a commoner. I have a place Yahweh's Kingdom family. This change in style can be described in a number of words: courtly, cultivated, dignified, exquisite, genteel, graceful, luxurious, majestic, ornate, stately, refined, rich, sumptuous and so on. I tend to like rich brocades and paisleys in my creations along with gold and/or silver trimmings. Please don't think I'm trying to be snobbish or uppity here, just trying to explain why my work is changing. However, I am primarily a quilter although I dabble in many other creative endeavors. So I will still quilt and keep on decorating my kitchen in a farm-like motif.
Now for today's project. I have a narrow (under 6 inches wide) section of wall that needed to be filled. I'm delighted to share this wall hanging with you.

The base was constructed by adhering a piece of stiff interfacing (a item I've had knocking around my stash for untold years) to the back of paisley fabric with heat activated bonding tape. Interfacing that is heat activated on one side will also work. Then I sewed a backing material face to face with the paisley like you would a pillow and left the top opened. After turning it right side out I stitched the top closed.

Proceeding to the fabric that the letters would be adhered to I decided on the size, cut out top and back, sewed them face to face and turned them right side out. I sewed the edges of these 'tabs' closed after turning them under but I believe that was a mistake. On making these again I would just trim the tops with pinking sheers and top stitch closed because they will not show when the hanging is completed anyways.Then I added narrow gold trim around the tabs.

NOW THIS IS VERY IMPORTANT: Next I drew the letters to be used on paper, turned the paper on the backside and traced the letters with a heavy black marker. I traced the BACKWARDS letters on the paper side of Heat and Bond. Then I cut out the letters with a safety margin around them and adhered the heat and bond letters to the BACK OF MY FABRIC. Next the letters were cut out, the paper backing of the heat and bond was removed and the letters were adhered to the front of the tabs.

Next I positioned and sewed on the M of 'Shalom', then the nest letter O. Then after measuring the spacing between those two letters, I spaced the remaining letters appropriately. this gives kind of a three dimensional effect.

A crystal bead was sewed to the point of each tab. Lastly two rings were added to the top of the backing to hang my creation by.
An added note: For you non-sewers - each piece could be simply bonded together using a heat and bond type product. The hanging could be either made of fabric or felt. A blanket stitch could be used as edging, glitter paint could emphasize the letters, etc. Use your imagination and have fun with this. If you have questions leave a comment and I'll respond either by email or in the comment section.
Thursday, April 4, 2013
Stepping Outside Of The Box
Okay, I'm not really talking about boxes here. But I do want to encourage you to think outside of certain parameters. In this case I'll be using non-traditonal(?) colors with my project. I made a toaster cover some time ago and when I planned my latest project I decided to integrate more of the same fabric into it. And so, the following is not made in the colors you may expect of the design but in the colors that suit it's surroundings. (On my computer screen the surrounding fabric looks blue but in reality it has a black background.)
I found this pattern (of which I enlarged the size) on a wonderful website http://quilterscache.com/ There are dozens of free quilt block patterns there. The one I used is here http://quilterscache.com/H/Hexagon&StarBlock.html
 I enlarged this pattern to make hot mats that measure 7 inches by 8 inches. It is layered with insulated lining and cotton batting. Again I'm trying to give you a touch of Hebrew flavoring. Step out of the box if you make this and use the colors that you love. After all, if our Creator didn't like color, everything you see would be in shades of gray. So go for it!
 I bet you couldn't tell I have red in my kitchen she said with a giggle!
I'm looking forward to my next post. I'm creating something I designed myself, not taken from free patterns on the internet this time. Stay turned.
PS I almost forgot to tell you the pattern above was paper pieced and the website it came from gives a great tutorial on it. Enjoy!
I found this pattern (of which I enlarged the size) on a wonderful website http://quilterscache.com/ There are dozens of free quilt block patterns there. The one I used is here http://quilterscache.com/H/Hexagon&StarBlock.html


I'm looking forward to my next post. I'm creating something I designed myself, not taken from free patterns on the internet this time. Stay turned.
PS I almost forgot to tell you the pattern above was paper pieced and the website it came from gives a great tutorial on it. Enjoy!
Tuesday, April 2, 2013
Another Bit Of Cross Stitch
Something I love about doing this blog is that I get to fill my home with the passion I have for this walk in Torah. Not only do I share the goodies I find on the internet with you but I'm able to enjoy the fruits of my labors when I show you what you can create.
Today I'm sharing another cross stitch picture you can make. The basic pattern is found here:
http://crossstitch.about.com/od/freecrossstitchpattern1/ig/Judaica-Patterns/Torah-Crosss-Stitch-Motif.htm
As you can see in the following picture that I've filled in the basic pattern and outlined it in a darker floss. Then I simply used a single thread across the body to simulate the wording on the scroll. The cross stitch fabric is actually taupe in color but it doesn't show well on blogger.
 An interesting tidbit for you: Did you know that the parchment that the Torah is written on (quite often sheep skin sections sown together) is called leaves and the rods that the Torah scroll is rolled on are called trees? That reminds me of Revelation 22:1-3 'Then the angel showed me the river of the water of life, sparkling like crystal, flowing from the throne of God and of the Lamb. Between the main street and the river was the Tree of Life producing twelve kinds of fruit, a different kind every month; and the leaves of the trees were for the healing of the nations--no longer there be any curses.'
How awesome is that?
Today I'm sharing another cross stitch picture you can make. The basic pattern is found here:
http://crossstitch.about.com/od/freecrossstitchpattern1/ig/Judaica-Patterns/Torah-Crosss-Stitch-Motif.htm
As you can see in the following picture that I've filled in the basic pattern and outlined it in a darker floss. Then I simply used a single thread across the body to simulate the wording on the scroll. The cross stitch fabric is actually taupe in color but it doesn't show well on blogger.

How awesome is that?
Subscribe to:
Posts (Atom)