Monday, December 30, 2013
This Week
I won't be posting this week as my 96 year old dad is gravely ill. Thank you for your prayers.
Thursday, December 26, 2013
Chewing On My Journal
I wrote on my post of three weeks ago that I was starting a journal on the land of Israel. Since I must wait to actually go there I decided to educate myself on everything available about it. Keeping a journal would fit the bill but where to start?
Originally I was planning to accumulate my material in a pre-bound sketchbook but, with so much subject matter available, I decided to use a large three ringed notebook. I will be able to use different materials like watercolor paper, scrapbook paper, cardstock, etc. that appeals to me as a base for each page. By working on individual pages I won't be confined to keeping my pages in order and can skip around to different subjects as I discover them.

I have different ideas for covering my journal still cooking in my brain. However, I've decided to start with a title page first.
 The internet is such a valuable tool for this kind of project. Just enter a subject in the search engine and there you will find much more than you thought possible on any subject matter.
A word of caution for you however. You will find free images of Israel on some websites but I found often that after you sign up for the freebies they either want payment (false advertising) or a watermark is left on the photo and you may not be able to use the full image. Be careful to give credit to those who ask for it and also watch out for copyright infringement.
I will be posting a list of subjects as I discover them on a sidebar on this blog and decide which to pursue. To start my list will include places of interest in the land (first and foremost), things about nature like plant and animal life, music, the arts, etc. By the time I fill my journal it will feel like I've already been to the land and settled in. :)
I should have my title page ready to share in my next post. Stay tuned.......
Originally I was planning to accumulate my material in a pre-bound sketchbook but, with so much subject matter available, I decided to use a large three ringed notebook. I will be able to use different materials like watercolor paper, scrapbook paper, cardstock, etc. that appeals to me as a base for each page. By working on individual pages I won't be confined to keeping my pages in order and can skip around to different subjects as I discover them.

I have different ideas for covering my journal still cooking in my brain. However, I've decided to start with a title page first.

A word of caution for you however. You will find free images of Israel on some websites but I found often that after you sign up for the freebies they either want payment (false advertising) or a watermark is left on the photo and you may not be able to use the full image. Be careful to give credit to those who ask for it and also watch out for copyright infringement.
I will be posting a list of subjects as I discover them on a sidebar on this blog and decide which to pursue. To start my list will include places of interest in the land (first and foremost), things about nature like plant and animal life, music, the arts, etc. By the time I fill my journal it will feel like I've already been to the land and settled in. :)
I should have my title page ready to share in my next post. Stay tuned.......
Thursday, December 19, 2013
The Five Books Of The Torah
I wanted to do something artsy this week for my readers but my efforts turned more towards the simple. In one of my recent posts I shared a gift created by a dear sister Lois who had gone home to our Abba and sent to me by her husband. When I opened the package I found a beautiful mini prayer shawl inside. On each side was appliqued the letter Shin.
 I decided to base my project around this letter. While I forgot to take photos of my progress, my explanation is pretty straight forward.
 First I measured the size of an unfinished picture frame I had in my stash. Then I cut out two pieces of watercolor paper to fit the frame. One of the pieces of paper I painted with navy blue craft paint. When that was dry I went over it with a heavy dose of glitter paint and set it aside. Next a stencil was cut of the Shin and transferred to the second sheet of watercolor paper. I then cut it out with an Exacto swivel stencil cutter. (This was the first time I used that stencil cutter and it was really easy and worked quite well. I highly recommend it if you haven't already tried using one.) Around the cut out shape I drew the outline of the letter with a dip pen and gold acrylic ink. After some thought I came to the conclusion that the only thing I could decorated the rest of piece with would be the names of the five books of the Torah. When I was finished penning in those names I glued the two pieces together so that the glittered surface would be outlined by the cutout.Next the frame was painted with colors that would complement the piece. Finally all was assembled and now I have another reminder of what my Abba has shared with me.


Wednesday, December 11, 2013
Yahweh's Kingdom
We have been studying about Yahweh's Kingdom and His government. And since I enjoy having little decorative pillows on display in my home, I had to add one with The Kingdom in mind.
 And I had to add the Hebrew word for Kingdom...another word added to my Hebrew vocabulary.

Thursday, December 5, 2013
Not A Finished Project But The Start Of One
After mulling an idea around in my brain for a few days, a conversation with an artist friend of mine prompted me to pursue it and shared it with my readers. My friend stated that she had signed up to go on an artists workshop to Ireland.
My husband's and my dream is to go to Israel. If you're reading this blog this comes as no surprise. I'd love to go to Ireland with my friend and paint but Israel is my obvious first choice. However, Yahweh has not opened the necessary doors to us yet so we continue to learn His ways and unlearn ours.
Now on to my idea. While we're waiting for that day to come, I want to learn everything I can about the land, the history, the people, etc. So I thought why not start a journal just for that purpose.

I could explore various themes with my journal before I get there. And with the internet one can acquire volumes of information just by engaging the search engines. The whole idea came about because of an invitaton from Pinterest to set up a travel category so one can plan a trip. What a great idea I thought! If you haven't set up a Pinterest account you are missing out on a great deal of information about many subject matters.
The hardest part of my project will be to organize my material. So...back to my computer. I will log my links and material and decide what to highlight to enter into my journal. And, of course, I want to make some artwork based on my research. Maybe I'll keep a separate journal just for that artwork.
I promise I'll share my journal here with each page I complete.
Blessings to you dear ones.
Thursday, November 28, 2013
Happy Hanukkah!

This will be the only time in our lifetimes that the first day of Hanukkah and Thanksgiving (for those in the US) is on the same day...a time to thank Yahweh for miracles.
Yahweh bless you dear ones... have a happy day!
Thursday, November 21, 2013
A Gift Of Love
Instead of posting a project made by yours truly this week I'm sharing a gift left to me by my dear friend and sister-in-Yahweh Lois. Lois and I 'met' on The Door Post, a teaching site and community catering to those who have found their way back to the Hebrew roots of the Bible. Lois lived in Oregon while I live in New York, a continent apart. We talked on the phone many times and Lois was always an encouragement to me. Lois left us in August of this year and I am content knowing that she is on 'temporary assignment' sitting at the feet of our King.
Imagine my surprise when a package came from Oregon this week with her name on it. I opened it and found a note from her husband Boyd and a beautiful 'mini' prayer shawl. Boyd said he found it on Lois's dresser with my name on it. Lois loved to sew and she made this treasure for me. I feel like she is giving me a hug when I wear it...still encouraging me.


Imagine my surprise when a package came from Oregon this week with her name on it. I opened it and found a note from her husband Boyd and a beautiful 'mini' prayer shawl. Boyd said he found it on Lois's dresser with my name on it. Lois loved to sew and she made this treasure for me. I feel like she is giving me a hug when I wear it...still encouraging me.


Thursday, November 14, 2013
Another Hanukkah Craft
One of the things I enjoy designing and making are candle mats. Last year I created a Hanukkah themed candle mat from wool fabric, with stenciled letters and sequins.
 I tried to iron this after I sewed the sequins on. A word of advise...DON'T. Sequins and heat don't mix. I thought I was far enough away from the sequins with my iron...wrong! I had just enough sequins to complete my project and really had to scramble to find enough to repair my mistake.
Only two more weeks until Hanakkah!

Only two more weeks until Hanakkah!
Thursday, November 7, 2013
The Stars Come Out For Hanakkah
Hanakkah is fast approaching and the search is on for interesting decorations. I came across directions for this weeks project at http://www.designmegillah.com/2013/10/paper-stars-for-chanukah.html?utm_source=feedburner&utm_medium=feed&utm_campaign=Feed%3A+designmegillah%2FrQWh+%28Design+Megillah%29
This was so much fun, sort of like being a kid again. Of course I had to add a little variety to mine. I used white card stock that I spray painted, pearlized card stock, and holographic printer paper.
 Some of my stars were doubled and some were left single. Then I added cording to each with a bead or two on the other end of the cord.

 I wound the cords around the scrollwork on my hanging lamp in our kitchen to hang my stars.


 As you can see, I had way too much fun. You have to try this one yourself. When you start making these stars you just can't stop!
This was so much fun, sort of like being a kid again. Of course I had to add a little variety to mine. I used white card stock that I spray painted, pearlized card stock, and holographic printer paper.


Thursday, October 31, 2013
A Hanukkah Pin For Cross Stitchers
The past two weeks have been a wild ride for me. After dealing with a relative's health issues and my own bad cold, I really appreciate having a couple of backup projects to share. Both projects are Hanakkah themed and were created last year before I started this blog. I'll share one of them with this post and the other at another time.
I enjoy designing various pins and when my daughter purchased a Menorah charm for me at a going-out-of-business beading store, it was the perfect embellishment to use on a pin.
To make this pin I used a 2 inch by 3 inch piece of 18 count cross stitch fabric for a base. I stitched a very simple pattern on it to simulate a tallit and straight stitches for the wording. Blue cross thread and silver metallic thread was used. The Menorah was attached with stitching and gold beads were stitched on to simulate candle flames. Then felt was glued on the back and the edges were finished with blanket stitch. The bottom was fringed and strands of beads were added at the bottom corners. Lastly a pin was sewn onto the back.
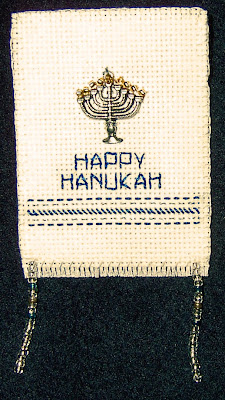 After I finished I realized that maybe Hanukah wasn't spelled right. What to do? I looked it up on the internet and found at least 16 or more different ways to spell it and this was included. Whew! I had visions of having to take it apart and redo it. I was glad not to have to.
Hopefully life will settle down to a roar very soon. I want to do much on this blog to make it more interesting to my viewers. Maybe more instructions, links and ideas to run with.
Hugs! Roxanne
I enjoy designing various pins and when my daughter purchased a Menorah charm for me at a going-out-of-business beading store, it was the perfect embellishment to use on a pin.
 |
| This measured just under 1 square inch. |

Hopefully life will settle down to a roar very soon. I want to do much on this blog to make it more interesting to my viewers. Maybe more instructions, links and ideas to run with.
Hugs! Roxanne
Thursday, October 24, 2013
A Little Dove Told Me
The idea I'm sharing can be modified in so many ways. My project today is a decorative pillow to be hung on the back of your dining chair. This could be adapted to any of the Feast Days or just to add some pizzaz to your dining spot. The sky is the limit.
Decide on a theme for your project. I chose favorites of mine...doves and the Tetragrammaton. I chose to make a little pillow about 4 by 9 inches as a base but they can be made any size you desire. I made sure that I sewed ribbons to be used for tying the pillow to the chair into the seam as I was making it. Give yourself plenty of ribbon length. You can always trim it if you've added too much.
 After making my pillow I cut dove shapes from felt (two each facing different directions) and sewed the layers together with a simple running stitch. A piece of gold felt was cut out and a smaller piece of white felt was glued on it. Then I carefully cut out the letters of the Tetragrammaton and glued those on. I proceeded to glue each assembled dove and center block onto my pillow. I little piece of ribbon was glued from each dove to the corner of the center block. Lastly I ran glitter glue around the frame of the letter block and a dab of glitter glue for the doves' eyes.
Decide on a theme for your project. I chose favorites of mine...doves and the Tetragrammaton. I chose to make a little pillow about 4 by 9 inches as a base but they can be made any size you desire. I made sure that I sewed ribbons to be used for tying the pillow to the chair into the seam as I was making it. Give yourself plenty of ribbon length. You can always trim it if you've added too much.

Friday, October 18, 2013
Pendants 3
This is the first time I have attempted making jewelry using Sculpey. Those who read this blog probably already know Sculpey is a crafting clay that you form and then bake to make your project permanent. I found it very easy to work. I basically broke off a piece of the clay and used a round plastic rod to roll it to the thickness I wanted much like making pie crust. I followed this by folding over the top edge of the clay to form a channel to pass a cord through. Then I broke off another piece and rolled it into very thin ropes. I used those ropes to form my design on the flattened piece of clay. I made three of these to be used as pendants. Then into the oven they went. Lastly I painted my pendants with a variety of acrylic paints and threaded each with a cord for wearing.
Please forgive me but I was so intent on making my project I forgot to take pictures of the process. And so, I only have pictures of the finished projects to show you.
The following two pictures are of the same pendant. However I added a little rhinestone to the bottom of my motif shown in the last picture.
 I could definitely use more practice at forming my designs but I thoroughly enjoyed making these regardless.
Please forgive me but I was so intent on making my project I forgot to take pictures of the process. And so, I only have pictures of the finished projects to show you.
 |
| I found that metallic and iridescent paints looked the best for this project. |
 | |||

Thursday, October 10, 2013
A Mezuzah For Indoors
Deuteronomy 6:4 Hear, O Israel: The LORD our God is one LORD:
Deuteronomy 6:5 And you shall love the LORD your God with all your heart, and with all your soul, and with all your might.
Deuteronomy 6:6 And these words, which I command you this day, shall be in your heart:
Deuteronomy 6:7 And you shall teach them diligently to your children, and shall talk of them when you sit in your house, and when you walk by the way, and when you lie down, and when you rise up.
Deuteronomy 6:8 And you shall bind them for a sign on your hand, and they shall be as frontlets between your eyes.
Deuteronomy 6:9 And you shall write them on the posts of your house, and on your gates.
With these words from the Torah in mind I designed a mezuzah to be placed inside our home next to our bedroom door.

First a size was selected and a pattern made accordingly. The shape of the mezuzah was cut out and adhered to the cream colored inner border with a heat bonding material. Then it was decorated with metallic craft paint and glitter glue. That in turn was sewn onto the first layer of the blue background. A slit was made in the second layer of the background for a place to insert The Shema. I made the three little tabs at the bottom each with two layers of felt and did a blanket stitch around the edges and placed them between the two background layers. The two background layers were then joined with a blanket stitch edging. Finishing touches were adding the beads at the bottom of the tabs and sewing a ring on the back to hang it by.
Thursday, October 3, 2013
The Tree Of Life
Gen 2:9 And out of the ground made the LORD God to grow every tree that is pleasant to the sight, and good for food; the tree of life also in the middle of the garden, and the tree of knowledge of good and evil.
In deciding what project to prepare for this weeks blog entry I chose a symbol from last week's Torah portion...the Tree of Life. Trees in general are one of my favorite subject matter when it comes to my crafting and art work. This week I opted for another mug rug, also one of my favorite things to make.
 For the tree I chose a commercial stencil from my stash. Various acrylic paints were used and applied to a piece of linen fabric. I chose a fancy piece of cotton fabric framed in a glitzy border fabric. This was layered with heat reflecting batting and backed and framed with plain red cotton. Another mug rug finished!
 Partake of the Tree of Life and be blessed!
In deciding what project to prepare for this weeks blog entry I chose a symbol from last week's Torah portion...the Tree of Life. Trees in general are one of my favorite subject matter when it comes to my crafting and art work. This week I opted for another mug rug, also one of my favorite things to make.


Thursday, September 26, 2013
Simchat Torah Is Here!
It took some thought to decide what kind of a project I should post this week. I've been looking at videos on YouTube of Simchat Torah celebrations. The term Simchat Torah means "Joy of Torah" and these celebrations are certainly joyous! The Torah scroll is the center piece of this celebration and there is so much dancing and singing around the written Word of YHWH that a second theme can be introduced to our crafting.
This year I decided on making another little decorator pillow with a dancing theme.
 I try to use crafting materials I already have and this was no exception. I chose some purple and white satins and cut them to the desired size. The white satin was applied to the purple with heat bonding web and outlined with glitter glue to seal the raw fabric. The words were written with a gel pen and Simchat Torah was written with glitter glue. When the glitter glue was dry (this took some time to dry...be patient) I then went to the sewing machine and sewed the back of the pillow to the front. A shoe shape was cut out from glitter encrusted canvas left over from a Purim project and glued on the pillow. The last touch was adding ribbons gathered together.
 Now put on your dancing shoes, turn up the music and dance around the precious Word of our King. Celebrate! with Lenny and Varna singing Simchat Torah.
This year I decided on making another little decorator pillow with a dancing theme.


Thursday, September 19, 2013
Have You Thought Of Doing This During Sukkot?
SUKKOT IS HERE!
Lev 23:39 Also in the fifteenth day of the seventh month, when you have gathered in the fruit of the land, you shall keep a feast to the LORD seven days: on the first day shall be a sabbath, and on the eighth day shall be a sabbath.
Lev 23:40 And you shall take you on the first day the boughs of goodly trees, branches of palm trees, and the boughs of thick trees, and willows of the brook; and you shall rejoice before the LORD your God seven days.
Lev 23:41 And you shall keep it a feast to the LORD seven days in the year. It shall be a statute for ever in your generations: you shall celebrate it in the seventh month.
Lev 23:42 You shall dwell in booths seven days; all that are Israelites born shall dwell in booths:
Lev 23:43 That your generations may know that I made the children of Israel to dwell in booths, when I brought them out of the land of Egypt: I am the LORD your God.
I've found many sites on the internet that display different ideas for Sukkot...decorations for their succahs, recipes and crafts. Many people invite family, friends and neighbors to join in the celebration. Taking videos of the festivities is a great idea but, for those who don't have access to a video camera, the next best thing is taking still photos.
I thought an interesting idea would be to print up those pictures and give little albums containing those photos to your guests as a memento of these Feast Days. So off to the craft stores I went in search of supplies.
 I found the holographic star paper (card stock weight) for the cover, the blue with white stars paper and the heavy weight black construction paper for the inside pages.
 I decided on the size of my album and cut the paper the appropriate size but twice as wide to accommodate folding it in half. Then I proceeded to measure out where to 'sew' the pages together. I shared this technique on a past post...http://asweetsavor.blogspot.com/2013/03/bookbinding-and-amidah-prayer.html
 The holographic paper I used for the album cover suggested the theme of my album 'Sukkot Under the Stars 2013'.

 I just can't resist adding embellishments to my creations. I finished the album with fringy yarn, sequins and beads. All that's needed to to attach my photos with self adhesive picture corners.
Chag Samaech to all my viewers. Have a wonderful Sukkot celebration!
Lev 23:39 Also in the fifteenth day of the seventh month, when you have gathered in the fruit of the land, you shall keep a feast to the LORD seven days: on the first day shall be a sabbath, and on the eighth day shall be a sabbath.
Lev 23:40 And you shall take you on the first day the boughs of goodly trees, branches of palm trees, and the boughs of thick trees, and willows of the brook; and you shall rejoice before the LORD your God seven days.
Lev 23:41 And you shall keep it a feast to the LORD seven days in the year. It shall be a statute for ever in your generations: you shall celebrate it in the seventh month.
Lev 23:42 You shall dwell in booths seven days; all that are Israelites born shall dwell in booths:
Lev 23:43 That your generations may know that I made the children of Israel to dwell in booths, when I brought them out of the land of Egypt: I am the LORD your God.
I've found many sites on the internet that display different ideas for Sukkot...decorations for their succahs, recipes and crafts. Many people invite family, friends and neighbors to join in the celebration. Taking videos of the festivities is a great idea but, for those who don't have access to a video camera, the next best thing is taking still photos.
I thought an interesting idea would be to print up those pictures and give little albums containing those photos to your guests as a memento of these Feast Days. So off to the craft stores I went in search of supplies.


Chag Samaech to all my viewers. Have a wonderful Sukkot celebration!
Thursday, September 12, 2013
Wednesday, September 4, 2013
Thursday, August 29, 2013
Feast Of Trumpets
The Feast of Trumpets, Yom Teruah, is in the seventh month of the Biblical calender Elul. It is a two day Festival that takes place next week. On our calender that is 9/4 Wednesday sundown to 9/6 Friday sundown. It is the only one of Yahweh's Feasts that starts on the new moon.
Lev 23:24 Speak to the children of Israel, saying, In the seventh month, in the first day of the month, shall you have a sabbath, a memorial of blowing of trumpets, an holy convocation.
Num 29:1 And in the seventh month, on the first day of the month, you shall have an holy convocation; you shall do no servile work: it is a day of blowing the trumpets to you.
Num 29:12 And on the fifteenth day of the seventh month you shall have an holy convocation; you shall do no servile work, and you shall keep a feast to the LORD seven days:
My project this week is a quilted banner.
 This banner measures approximately 30 inches wide by 57 inches long.
Lev 23:24 Speak to the children of Israel, saying, In the seventh month, in the first day of the month, shall you have a sabbath, a memorial of blowing of trumpets, an holy convocation.
Num 29:1 And in the seventh month, on the first day of the month, you shall have an holy convocation; you shall do no servile work: it is a day of blowing the trumpets to you.
Num 29:12 And on the fifteenth day of the seventh month you shall have an holy convocation; you shall do no servile work, and you shall keep a feast to the LORD seven days:
My project this week is a quilted banner.

Thursday, August 22, 2013
Help On The Door Of My Refrigerator
I've wanted to learn the Hebrew language for some time and I've had an on-again-off-again experience with it. I just get so far and then slack off for a while so it's back to review time and time again. I've come up with a project that might be an answer to my dilemma and one that might inspire a reader or two.
I'm sure you've seen those colorful, plastic letters with magnets on them. You know...the ones that children like to play with on the door of the refrigerator. These magnetic letters are available in Hebrew but bright, primary colors and plastic are not my favorite form of decor so I've devised my own version of Hebrew letters. While attempting to find material in my own stash of supplies, I've gone back to good old felt.
First I made simple block letter templates of cardstock.
 I decided on what word I would spell out first...shofar. I cut out the appropriate size background felt for my letters...white. But because my refrigerator, where I would be displaying my word is white, I decided to place the white background onto a larger piece of green felt. That would make each letter stand out better. I cut out both the white and the green felt with pinking shears to give it some character.
 I traced each letter onto the white felt and outlined it with embroidery thread. Then I cut out a less full letter of the green felt to apply inside the outline. Lastly I glued sheet magnet to the back of each letter.
 The letters progress until...
 I haven't completed all of the letters I will need to spell out words in the future but I will add them until I have enough to do the job.
The finished word 'shofar'.

 Each week I'll post a new word or two. Because I am often passing by the fridge I can't help but have the word posted implanted in my memory.
As I was composing this post I realized that I forgot to add the vowel marks to this word. I will add them next week and connect the word shofar to that post.
And what is a shofar you ask? According to Wikipedia, a shofar is a horn, traditionally that of a ram, and used for Jewish religious purposes. But that only scratches the surface of the matter. Come back next week and see how this applies to the Fall Feasts.
I'm sure you've seen those colorful, plastic letters with magnets on them. You know...the ones that children like to play with on the door of the refrigerator. These magnetic letters are available in Hebrew but bright, primary colors and plastic are not my favorite form of decor so I've devised my own version of Hebrew letters. While attempting to find material in my own stash of supplies, I've gone back to good old felt.
First I made simple block letter templates of cardstock.


The finished word 'shofar'.


As I was composing this post I realized that I forgot to add the vowel marks to this word. I will add them next week and connect the word shofar to that post.
And what is a shofar you ask? According to Wikipedia, a shofar is a horn, traditionally that of a ram, and used for Jewish religious purposes. But that only scratches the surface of the matter. Come back next week and see how this applies to the Fall Feasts.
Thursday, August 15, 2013
This Little Tune Kept Going Through My Head...
...and I had to act on it. This week's project is the name of our beloved Tzion spelled out in a display.
First I drew my chosen letters on mat board and cut two of each out using a straight edge and an craft knife. I also cut the same shapes out of thin (1/4 inch) styrofoam that was came in packing material. I proceeded to glue together each letter sandwich style...a set of two letters with the styrofoam in between.
 |
| Raw materials |
 |
| The letters cut out. |
 |
| Sandwiched layers. |
 |
| You can see the gold ribbon trimming the edge of the letters. |

I've seen tutorials on making 3D cardboard letters but this method went a lot faster.
I hope you enjoy the following YouTube video...a song about Tzion.
Thursday, August 8, 2013
In Anticipation Of A Future Journey
I, like many of my viewers, dream of a trip to Israel. The option isn't available to me at the present time but I thought I'd have fun with a little fantasy. I found an small and unfinished wooden suitcase at the local craft store. It measures about 3 by 5 inches with a depth of 1 3/4 inches.
 I lightly sanded it and painted it with an acrylic base coat. Then the fun began. I made a copy of a map of Israel, shrunk it in size and printed it up on my copier. Next I typed up words in English and Hebrew on my office program and printed them up. I cut the border off of the map and cut the words out. Everything was glued onto the suitcase and sealed. I felt that it still needed something so I floated a darker color acrylic paint on the edges of the suitcase.


 I may not be able to travel to Israel for now but this continues to wet my whistle for the Holy Land. And I plan to be packing a much larger suitcase when the opportunity arises. :)


Subscribe to:
Posts (Atom)